WordPress debug mode is a powerful feature designed to help developers identify and resolve errors during the development process. While it’s invaluable in a staging environment, keeping debug mode enabled on a live website can expose sensitive information, putting your site at risk of security vulnerabilities and creating a poor user experience. In this guide, we’ll walk you through the steps to disable WordPress debug mode safely and ensure your website remains secure and professional.
What is WordPress Debug Mode?
WordPress debug mode is a feature that displays PHP errors, warnings, and notices directly on your website. It is controlled through the WP_DEBUG constant in the WordPress configuration file. While this mode is beneficial for debugging during development, it should be turned off for production sites to avoid revealing sensitive details about your website.
Why Should You Disable Debug Mode on a Live Site?
- Security Risks: Debug mode can display sensitive paths and configurations that hackers might exploit.
- User Experience: Visitors may see error messages, making your site appear unprofessional.
- Performance: Debug mode can slightly impact performance due to additional error logging.
Steps to Disable WordPress Debug Mode
Disabling debug mode in WordPress is simple and requires basic file editing. Follow these steps:
Step 1: Access Your Website Files
You need to access your WordPress installation files. There are two common ways to do this:
- Using a Hosting File Manager: Log in to your hosting account (e.g., cPanel) and navigate to the file manager.

2. Using an FTP Client: Use an FTP client like FileZilla to connect to your website.
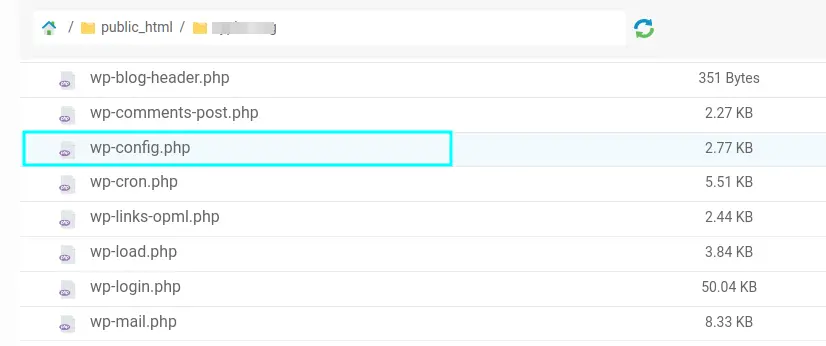
Step 2: Locate the wp-config.php File
- In the root directory of your WordPress site (usually public_html), find the file named wp-config.php.

2. Download a backup of the file before making any changes (this is a good practice).

Step 3: Edit the wp-config.php File
- Open the wp-config.php file in a text editor (e.g., Notepad++ or VS Code).

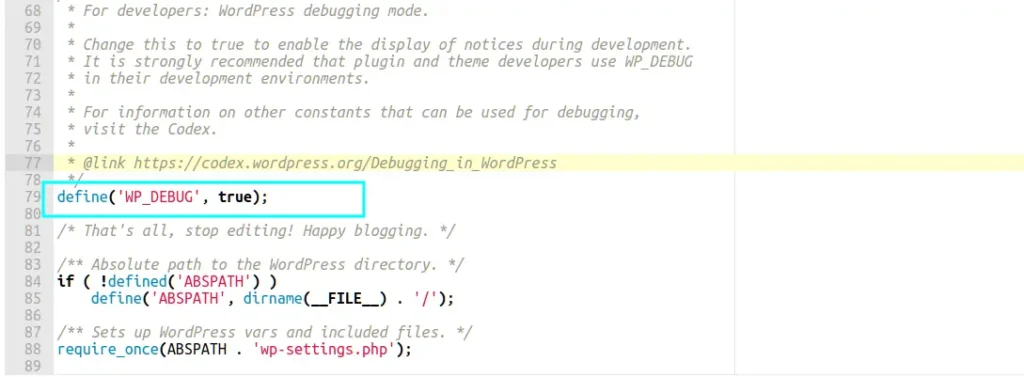
2. Look for the line:
define( 'WP_DEBUG', true );3.Change the true value to false.
define( 'WP_DEBUG', false );If the line doesn’t exist, add the following code before the line that says “That’s all, stop editing! Happy publishing.”:
define( 'WP_DEBUG', false );Step 4: Save and Upload
- Save your changes to the wp-config.php file.
- Upload the modified file back to the root directory if you used an FTP client.
Step 5: Verify the Changes
- Clear your browser and server cache.
- Visit your website and check that no debug messages are visible.
Optional: Disable Additional Debug Features
WordPress has advanced debug settings, which you might also want to disable:
1.Debug Logging: Ensure that the debug log is disabled by verifying this line in wp-config.php.
define( 'WP_DEBUG_LOG', false );2.Debug Display: Disable on-screen error display:
define( 'WP_DEBUG_DISPLAY', false );Conclusion
Disabling WordPress debug mode on a live site is essential for maintaining security and professionalism. Always remember to re-enable it temporarily if you need to troubleshoot issues in the future. Following the steps above will help you disable debug mode safely and efficiently.
Do’s and Don’ts
- Do: Backup your wp-config.php file before making changes.
- Don’t: Leave debug mode enabled on a production site.
- Do: Test your website after making the changes.
